Mesdames et messieurs, enfants et français charmants,
So you want to make macarons? Welcome to the second instalment of La Macaronicité at Syrup & Tang! If you missed the introduction, click here to read it.
La Macaronicité: Technique and knowledge
Main sections:
Ingredients
Fundamentals
Recipe A — macarons au blanc monté
Background to my recipe
Please remember that this material is copyright. If you want to use any part of it (beyond a very short quote), please contact me for permission.
There’s a lot of information here and it’s possible that not everything applies to your kitchen or experience. I don’t know everything about them (there’s a limit to how many kilos of almond meal a poor writer can buy!). I welcome feedback about other solutions/explanations/ideas, but please don’t submit comments listing other recipes unless it contributes to a better understanding of the actual process and problems. You’re welcome to contact me directly if you prefer and I’ll incorporate helpful info into the article where appropriate.
Ingredients
The macaron batter consists of only four ingredients:
- almond meal (ground almond) – amandes en poudre
- pure icing sugar (confectioner’s sugar, no starch added) – sucre glace
- egg whites, preferably old – blancs d’œufs
- sugar, preferably caster sugar – sucre semoule
On occasion you might also see mention of cream of tartar or salt, both of which strengthen egg white foam.
The batter may be coloured (very common) and flavoured (less common, though not too difficult).
There are three types of recipe:
- macarons au blanc monté (1) – a simple eggwhite foam is combined with the dry ingredients; preferred in Pierre Hermé’s books
- macarons au blanc monté (2) – a simple French meringue is combined with the dry ingredients; in most other books, including Alain Ducasse
- macarons au sucre cuit – an Italian meringue is combined with the dry ingredients; preferred in most professional books
I’ll explain the second recipe type (French meringue) here, and introduce the third type in the next article.
Fundamentals
Almond meal is a fine cream-coloured powder made from ground blanched almonds. If it is very fresh it might be a little damp, so you could dry it very gently in a barely warm oven. You can make your own almond meal, but it will be hard to grind fine enough and will be damp.
Icing sugar (confectioner’s sugar) is often sold with starch added (then called ‘icing mixture’ in Australia). This prevents it from clumping, but can leave a pasty mouthfeel if used in icing and is undesirable (though not fatal) in macarons. Use unadulterated (pure) icing sugar if possible.
The almond meal and icing sugar should be put through a high speed food processor or a (clean) blade coffee grinder to obtain a very fine powder (about 10 seconds on highest speed should suffice). Most almond meal is more like sand than flour, so if you leave it unprocessed the macarons will have a coarser surface. No big drama, but we’re looking for perfection, right?
Egg whites consist of proteins and quite a lot of water. The water can make the final batter unmanageably wet, either in the making or in the oven (where the macarons refuse to dry adequately). Old egg whites have lost some of their water content through evaporation so can yield a more successful batter, though this is by no means guaranteed (from personal experience, even evaporating 15% of some egg whites didn’t help). There are also changes in the composition of the proteins with time, but I haven’t seen any analysis to explain why this might be better for macarons. It is also said that older egg whites yield a thicker meringue shell. Many professional recipes use dried egg white (egg white powder) to bolster the protein content.
Bottomline: do not fret about a few hours of ageing here or there; if you have time to age your eggs that’s good. If you don’t, then just use the oldest eggs (ie, not the newest carton) in your fridge that haven’t gone rotten yet.
Oven temperature is a big problem. Very few recipes specify whether the author uses a conventional or a fan-forced (convection) oven. This difference has implications for (1) even temperature, (2) speed of temperature recovery after putting the tray in the oven, (3) actual temperature appropriate for your oven, (4) humidity.
It would seem that a fan-forced oven sometimes offers greater success (though others say the opposite), but I haven’t been able to test this firsthand, as I live in renting-with-old-gas-oven land. Many recipes that explicitly mention a conventional oven recommend starting the macarons at a high temperature and then leaving the oven door ajar and dropping the temperature. There are two possible reasons: (1) this gives the initial lift that the batter needs and then permits drying and firming without burning (propping the door open helps lower the temperature quickly), and (2) this seals the surface of the macaron quickly, preventing cracking and helping it lift as the foot forms. Of course you could take the Roux brothers’ (Roux Brothers on Patisserie) approach and just have two ovens at different temperatures. Yeah, right.
To ensure slow, even heat distribution underneath the macarons, it’s desirable to use two or even three baking trays (cookie sheets) on top of each other. Again, many authors fail to mention that they’re using (and stacking) professional-grade aluminium sheets which are considerably thicker than the cheapo homecook type. I’d probably need six of my flimsy baking trays stacked together! I recently tried using an insulated baking sheet for the first time and found that my previous problems with sticky-bottomed macarons were greatly reduced.
Baking on non-stick baking paper is the best approach. Silicone sheets and Silpat are fine for a successful batch, but just try removing tenaciously sticky, fragile, failed macaron shells from one of these and it will end in tears!
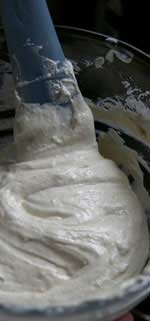
Meringue: when you incorporate it into the almond mixture, you don’t want any pussyfooted folding (e.g., as for mousse or sponges) but nor are you allowed to beat the shit out of it. You need to work quickly and efficiently, incorporating the dry ingredients smoothly but without excessive mixing. At first the ingredients won’t mix well, but it comes together quickly. The final batter is pale and smooth, with no visible aeration.

Piping: if you’re confident at piping, pipe from the side, pulling the tail up over the macaron so that it disappears quickly. However, it’s easier to pipe vertically over the centre, about 5 mm above the tray surface. Flick the nozzle towards the edge as you pull away to finish.
Crusting: more than half of the world’s macaron recipes mention leaving the piped macarons to rest so that they form a ‘skin’ or ‘crust’. There seems to be very little evidence that this makes any difference in the final product. For some batters it will actually cause a duller shell. Maybe resting is necessary for some people’s kitchens, but I didn’t observe a benefit across four tests. It does, however, seem wise to let the batter settle for just a few minutes on the baking tray (see ‘cracking’). [UPDATE: after more testing, I now recommend permitting the shells to sit for half an hour or so. It helps reduce some problems if your oven has strong heat below the baking tray.]
Humidity: I doubt that humidity in the oven is an issue for anyone, but do avoid making macarons on a very humid day as the mixture will tend to be too damp or require adjustment.
Cracking: a few minutes after going into the oven, some macarons batters will develop fissures. In my experience this is the result of (1) overmixing, or (2) rushing the piped batter straight into the oven.
Maturing/ripening: the shells are not at their best when fresh. They will be slightly chewier around the edges than expected. Usually the macarons are assembled and then stored in the fridge for one to two days, after which they are heavenly.
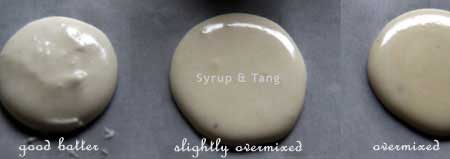
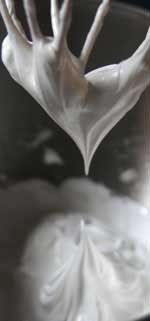
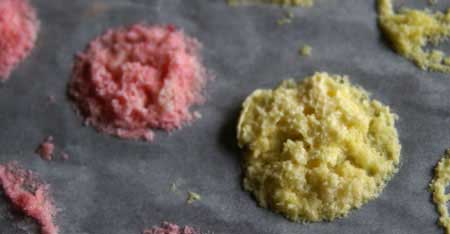
For your edification, here are some useful photos:


Freshly piped good batter is on the left. Note how the overbeaten batter, on the right, is darker and looks slightly translucent. (The specks in the batter are vanilla.)
If you’re not scared yet, still ready to face the batter, congratulations!
Recipe A
macarons au blanc monté (2); (French meringue)
This method is the one you’ll find almost everywhere on the internet and in most cookbooks. It is simple but fraught with disappointment. In my experience (dodgy ovens, no fan, domestic trays), this style of recipe can yield less than 50% success rate. If you possess a digital probe thermometer or a sugar thermometer I’d recommend waiting for Recipe B. But there are perfectly happy people out there with, presumably, better kitchens than I. (You can see a charming fella explaining it (in French) on video here, and one of the clearest shorter explanations in writing is by Coco&Me. One brave experimenter, Veronica’s Test Kitchen, may also have useful tips for you if you prefer this style of recipe.)
Regardless of what the recipes say, I suggest first deciding how many eggs you want to sacrifice. Crack and separate the eggs, remembering to keep the whites and all vessels and implements scrupulously free of fat or egg yolk. You don’t need to weigh the egg whites at this point. One egg white will yield about fourteen 3-4 cm macaron shells.
This recipe will benefit most from aged egg whites or egg white powder. You can age the whites by leaving them uncovered at room temperature for 24-72 hours in a shallow bowl. This allows some of the moisture to evaporate. Cover the bowl with gauze or kitchen paper (not plastic) if you want to avoid any dust or other surprises. People are often apprehensive about leaving egg whites at room temperature, but the final cooked product will be safe even if the raw egg white might have been contaminated.
Formula and method
When you’re ready to start cooking, weigh the egg whites and then scale the recipe appropriately. The formula is below.
‘eggwhite’ refers to the weight of the egg whites in grams. The righthand column provides an example calculation.
| Ingredient |
Amount |
Example (with eggwhite=50 gm ) |
| Almond meal |
1.3 x eggwhite |
1.3 x 50 = 65 gm |
| Icing sugar |
1.6 x eggwhite |
1.6 x 50 = 80 gm |
|
|
|
| Castor sugar |
0.8 x eggwhite |
0.8 x 50 = 40 gm |
| Egg white |
|
50 gm |
|
|
|
| Total weight |
|
_______ 235 gm |
A batter with 50 gm egg white should yield one baking tray 30 cm x 40 cm or approximately 25 shells.
Preheat your oven:
Conventional oven: centre rack, 180C. Convection oven: 160C
- Stack two or three heavy baking trays. Line the top tray with non-stick baking paper. If you’re well organised, mark the paper with 2 or 3 cm circles, spaced about 4 cm apart (the piped batter will spread about 1 cm).
- Process the almond meal and icing sugar at high speed to achieve a fine powder. Sift (or whisk the powder by hand) to break up any lumps of powder.
- In a clean bowl, beat the room-temperature egg whites until foamy and just at soft peaks. Gradually beat in the castor sugar, adding a little at a time. Beat on medium speed for a number of minutes until you have a firm, glossy and compact meringue.


- Sprinkle half of the dry mixture over the meringue and fold in with a spatula using a circular motion around the bowl and under the batter. Repeat with the remaining powder. You don’t need to be gentle, but the goal is to incorporate the dry ingredients quickly to avoid overmixing. It’s better to undermix than overmix. You can add colourings or flavourings during this mixing.
- The final batter should be the colour of pale ivory (if you haven’t coloured it) and smooth and thick but flowing (typically referred to as being ‘like magma’, but as few of us have visited an active volcano or been to the centre of the Earth…). A ribbon of batter dropped from a spoon onto the top of the remaining batter should take about 30 seconds to disappear.
- Dab a little batter under each corner of the baking paper on the tray to anchor it (otherwise it’ll slip).
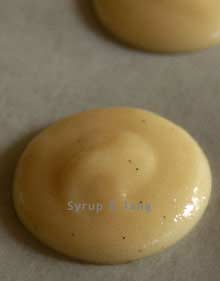
- Spoon the batter into a piping bag/gun with a 8-10 mm nozzle and pipe evenly onto the baking paper. Mild peaks should settle back into the batter eventually. If they don’t disappear, tap the tray repeatedly on a table until the peaks have largely disappeared. Usually the batter will spread a little and any bumps will disappear. Sometimes the batter is quite runny and will rapidly flatten out. (It might be overmixed.) This consistency will often yield irregular shells. If the batter never stops spreading then you should probably scrape it all back into a bowl, gently add some more almond meal and try again.
- If you want, you can leave the piped batter to dry for anywhere between 20 mins and two hours.
- Place the tray in the oven. If you’re using a conventional oven, cook as normal for two mins and then open the oven door about 2.5 cm and place a wooden spoon between the door and the jamb to permit hot air to escape for the rest of the cooking time. (Your spoon might get a bit singed, so soaking it in water briefly beforehand is a good idea.) For a convection oven, you will need to experiment a little, possibly leaving the door ajar for the whole time.
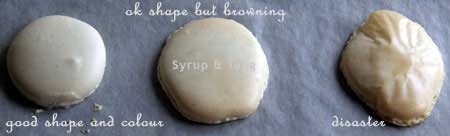
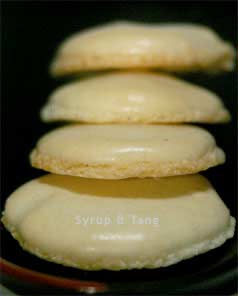
- At the 5 minute mark the shells should have lifted and developed ‘feet’. At the 6-7 minute mark they should be starting to colour just slightly. Rotate the baking sheet if the colouring is uneven. The outermost shells often have to be sacrificed in order for the centre ones to be cooked, but the majority should be no more than the palest cream colour. They are probably ready if a shell moves only reluctantly on its foot when you lightly nudge it with a finger.
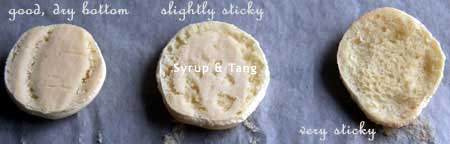
- Remove from the oven and leave on the tray for a minute or two. Gently try to lift one of the outermost shells. A slight twisting motion or a peeling motion can help. If the shells stick badly, but are firm, try spraying or brushing a little water under the baking paper. This will moisten the paper and soften any stuck bits after 1-2 minutes. Don’t use too much water or the shells may start to dissolve around the edges. Remove each shell by gently peeling away the baking paper or with the aid of a thin palette or paring knife. Another solution to the sticking problem can be to place the paper or Silpat (with stuck macarons) in the freezer for a while.
- Once removed from the sheet, leave the shells to cool on a wire rack, face up.
- If you haven’t already made a filling, do so now. A simple chocolate ganache is one of the easiest quick fillings. (Break 50 gm dark chocolate into a bowl. Bring 60 gm cream to a gentle simmer and then pour over the chocolate. Leave to stand for two minutes, then mix together with a spatula. Allow to cool slowly, stirring occasionally. When completely cool, apply a small blob to the underside of one shell and gently press another shell on top. Refrigerate for 24-48 hours if you are the patient type.)
- The plain shells can be frozen for a few weeks quite well. Complete macarons store well in the fridge for two to three days. After that they become softer. Eat macarons at room temperature.
Background to my recipe
A very standard formula for the French meringue style of macaron recipe is approximately 1.25:2.3:1.0:0.3 (almond:icing sugar:egg white:caster sugar). Variants of this are used by Alain Ducasse, Christophe Felder, J.M.Perruchon & G.J.Bellouet and Dean Brettschneider. Pierre Hermé’s formula is similar, though not using a meringue. Each of these authors has a different approach to temperature and crusting. Popular American writer David Lebovitz published a chocolate macaron recipe on his site which many people found reliable (and is the one I made without trouble and showed a picture of in the first article in this series). His recipe is, however, much sweeter and uses a stronger meringue. I noticed, too, that Pascal Rigo’s popular recipe also takes this approach, as does Sydney chef Justin North in his recent book French Lessons. I didn’t want the sweetness, but tried adapting the approach, with the result presented above (formula of 1.30:1.60:1.00:0.80). The total sugar is only slightly higher than the most common formula and the slight increase in almond meal seems to make it less wet.
Famous internet recipes: if you go surfing you’ll find many recipes. Some are useful, some are rubbish, and many are unattributed. There’s a very popular online recipe which has spread far and wide but is rarely correctly attributed to Pascal Rigo (from his wonderful book American Boulangerie). The majority of the remaining recipes are from Pierre Hermé’s various books.
Famous chefs’ recipes: even Hermé has occasionally underdescribed his recipes, but real disapproval should be directed at those who have blithely provided poorly explained recipes for a product as temperamental as this. I greatly doubt that most restaurants make their macarons using the first style of recipe I discuss (unless they have access to egg white powder), so why foist it on the uninitiated? Note, too, that French pâtissiers readily admit that it can take some time for a macaron-maker to get used to a new kitchen if he/she changes jobs.
Troubleshooting
My macarons are delicate and sticky. They fall apart or lose their insides when I try to lift them off the baking paper. Solution: Don’t wet the paper. Instead, place the sheet of paper (with stuck macarons) on a drying rack and walk away for a few hours. In my experience the shells will be fairly easy to peel off once they’ve cooled and their bases have dried a little. These shells will usually be too damp for use for proper macarons. Save them for one of the alternative uses listed below.
My macarons are firm and chewy. Solution: Cook them for less time or at a lower temperature.
My macarons brown too quickly on top. Solution: Try covering a spare oven shelf with foil and place it on the rung above the macarons in the oven.
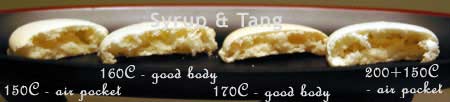
My macarons have a big empty space under the shell. Solution: Cook them at a higher temperature. (There may also be other causes.)

My macarons have frilly feet which extend sideways from the shell. Solution: This is often a problem with the simple recipe, but seems worse at low temperatures. Try letting the piped batter rest for a while before baking.
Alternative uses
Whilst I wish everyone success, it’s worth having a backup use for any abortive macaronic adventures.
Dessert 1: break up the macarons and place a number of pieces in a tall glass. Add morello cherries. Pour on some port. Leave to stand for 15 minutes. Top with whipped cream. Pour a little cherry juice over the cream. Serve.
Dessert 2: make a trifle-like dish with berries.
Dessert 3: give to unsuspecting friends or neighbours as ‘soft almond meringues’.
Phew!
You can read La Macaronicité 1: an introduction to the macaron.
La Macaronicité 3: the more reliable macaron recipe and a few tips.
La Macaronicité 4: fillings, flavours, frippery.
La Macaronicité 5: Macawrongs and macarights, macarons day and night.
– DM